Before, After and future.

Forum for discussion of Deciduous bonsai – Maples, Crabapple, Hornbeam, Elm species etc.
User avatar
Dumper
Aussie Bonsai Fan
Aussie Bonsai Fan
Posts: 660
Joined: June 3rd, 2009, 8:35 am
Bonsai Age: 0
Location: Nunawading
Been thanked: 1 time
Contact:

Before, After and future.

Post by Dumper »

Hi all.
This is a thread about the tree that i use in the photography tut.

To me. this tree has been happy growing. but now i would like to make it even more......"WOW" feeling.
All suggestions are welcome

Last year. this is how it look like.
Image

This year.
Image

so now..
for the future.... any suggestions?

John
User avatar
hugh grant
Aussie Bonsai Fan
Aussie Bonsai Fan
Posts: 1131
Joined: November 21st, 2009, 7:30 pm
Favorite Species: Kunzea
Bonsai Age: 16
Bonsai Club: CCBC, CBS, VNBC, BSST
Location: Mount Victoria, NSW (Blue Mountains)
Has thanked: 1 time
Been thanked: 11 times
Contact:

Re: Before, After and future.

Post by hugh grant »

get some more ramification into it :D
nice tree by the way

hugh ;)
Tree Makers Making Australian Bonsai
School - Nursery - Store

Upper Blue Mountains NSW
https://www.treemakers.net/

facebook: https://www.facebook.com/treemakersbonsai
Instagram: https://www.instagram.com/tree_makers/
E: Hughgrant@treemakers.net
User avatar
Dumper
Aussie Bonsai Fan
Aussie Bonsai Fan
Posts: 660
Joined: June 3rd, 2009, 8:35 am
Bonsai Age: 0
Location: Nunawading
Been thanked: 1 time
Contact:

Re: Before, After and future.

Post by Dumper »

thanks Hugh.
I'll try to ramify the tree more. more compact foliage .

for ppl that hate untidy wiring method. i am sorry. i ran out of thicker wire to wire the branches.
User avatar
Jamie
Bonsai passionardo
Bonsai passionardo
Posts: 6829
Joined: August 21st, 2009, 8:08 pm
Favorite Species: CLERO!!!,ficus, celtis, juniper, elms
Bonsai Age: 9
Bonsai Club: AUSBONSAI.COM
Location: queensland, Hervey Bay
Been thanked: 2 times
Contact:

Re: Before, After and future.

Post by Jamie »

gday champ!

i like where this one is headed. how tall is it? if it were mine i would be taking some cuttings and strinking them, then using the struck cuttings to fill in that gap at the base where the roots go apart. i think you could extend the lower branches out a little more, and it will fill in nicely! the reason i say about the branching and to get it out further is that branching on tall trees that are short make the tree seem even taller. if you spread it out some it will help the overall composition.

J. :D
SHOHIN YAKUZA!!!
:twisted: taking the top half of trees of since 2005! :twisted:
and growing trees for the future generations! 50+ year plans :D
User avatar
Dumper
Aussie Bonsai Fan
Aussie Bonsai Fan
Posts: 660
Joined: June 3rd, 2009, 8:35 am
Bonsai Age: 0
Location: Nunawading
Been thanked: 1 time
Contact:

Re: Before, After and future.

Post by Dumper »

it is around 50++ cm.
Jamie wrote:if it were mine i would be taking some cuttings and strinking them, then using the struck cuttings to fill in that gap at the base where the roots go apart
basically in a way plant the new cuttings and graft it where the root seperate?
User avatar
Jamie
Bonsai passionardo
Bonsai passionardo
Posts: 6829
Joined: August 21st, 2009, 8:08 pm
Favorite Species: CLERO!!!,ficus, celtis, juniper, elms
Bonsai Age: 9
Bonsai Club: AUSBONSAI.COM
Location: queensland, Hervey Bay
Been thanked: 2 times
Contact:

Re: Before, After and future.

Post by Jamie »

pretty much mate, get the cutting to strike then use them to fill in the gap ;) they will also give you the ability to chose where they exit the trunk and you can build a nebari.

J :)
SHOHIN YAKUZA!!!
:twisted: taking the top half of trees of since 2005! :twisted:
and growing trees for the future generations! 50+ year plans :D
User avatar
Chris H
Aussie Bonsai Fan
Aussie Bonsai Fan
Posts: 399
Joined: August 21st, 2009, 10:15 pm
Favorite Species: All of them.
Bonsai Age: 15
Bonsai Club: School of bonsai
Location: Sydney
Contact:

Re: Before, After and future.

Post by Chris H »

I like the trunk as it is, the seperation into two parts provides movement at the base. Solid Nebari is great but this tree is unique. Id leave it as is.
For mine all it needs is more branching.
Aikido keeps me rolling; Bonsai keeps me still.
User avatar
dayne
Aussie Bonsai Fan
Aussie Bonsai Fan
Posts: 657
Joined: July 16th, 2009, 8:42 pm
Favorite Species: juniper, pine
Bonsai Age: 0
Bonsai Club: sunshine coast
Location: sunshine coast

Re: Before, After and future.

Post by dayne »

either chop it back to about 200mm high or thread graft some branches into thos gaps pretty easy fix and like jamie said fix up the roots while its going in for an overhaul
User avatar
kcpoole
Perpetual Learner
Perpetual Learner
Posts: 12292
Joined: November 12th, 2008, 4:02 pm
Favorite Species: Maple
Bonsai Age: 15
Bonsai Club: the School Of Bonsai
Location: Western Sydney, NSW, Australia
Has thanked: 19 times
Been thanked: 96 times
Contact:

Re: Before, After and future.

Post by kcpoole »

I like the base and trunk as it is now.
The bootom left branch needs to be much bigger and extend more and the one above it lowered if you can to Fill in the gap below, and create a void above ( maybey Graft a new one in there)?

In the right, I woud like to lose the bottom branch, keep the next one but extend it and develop it like the first branch. The next one up I would also lose.
This I would I think give seaparation and plenty of room to grow the selected branches
If I get a chance I may do a Virt of what I mean but not tonight :-)

Ken
Check out our Wiki for awesome bonsai information www.ausbonsai.com.au/wiki
What is Bonsai? http://www.ausbonsai.com.au/wiki/index.php?title=Bonsai
What should I do now? http://www.ausbonsai.com.au/wiki/index.php?title=Newbie
How do I grow a Bonsai? http://www.ausbonsai.com.au/wiki/index. ... _a_Bonsai?
Visit a Bonsai nursery to see some real nice trees http://www.ausbonsai.com.au/wiki/index. ... _Nurseries
User avatar
Dumper
Aussie Bonsai Fan
Aussie Bonsai Fan
Posts: 660
Joined: June 3rd, 2009, 8:35 am
Bonsai Age: 0
Location: Nunawading
Been thanked: 1 time
Contact:

Re: Before, After and future.

Post by Dumper »

Thanks for all the input.

Ken i'll wait for your virt

cheers
craigw60
Aussie Bonsai Fan
Aussie Bonsai Fan
Posts: 1904
Joined: January 12th, 2010, 12:02 pm
Favorite Species: many
Bonsai Age: 25
Bonsai Club: yarra valley
Location: vic
Been thanked: 1 time

Re: Before, After and future.

Post by craigw60 »

Hi John, I would take the Ant solution and shorten it for more taper. In the process of doing that you would more than likely get it to bud back some more and increase the volume of branches lower down the trunk.
Craig
LLK
Aussie Bonsai Fan
Aussie Bonsai Fan
Posts: 1025
Joined: February 4th, 2009, 10:03 pm
Favorite Species: Acacia howittii
Bonsai Age: 25
Bonsai Club: CBS, WCBG
Location: Canberra
Has thanked: 1 time
Been thanked: 35 times

Re: Before, After and future.

Post by LLK »

Hello John and all,

Please excuse me for mentioning a few things that might generally add to our discussions on bonsai.
The first is: let's not talk about "a tree" or "the tree". It's got a name and it's got growing habits, which
have to influence our way of thinking about it. Secondly, if an opinion on styling is needed, let's not just show only one side of it. Thirdly, let's post photos that allow everyone to get a good visual impression of it. And let's not throw ourselves into the fray of hasty, superficial judgements.

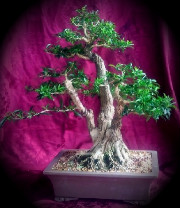
So, John Dumper has posted a Chinese elm here. The vigorous branching at the summit of the tree as well as the enormous, divided roots are typical of this species, which is strongly apically dominant, with an equally strong root system. (It beats that of the privet!) The two lower branches will never develop properly as long as the upper ones are allowed to grow as they are now. The root division would in nature have been below soil level. To get a flare at the trunk base, they need to be shortened drastically over a period of time and buried below the surface again. I agree with the people here who have advised shortening the trunk to get a better taper. Two more things: # 1: this Chinese elm is planted too far off the middle of the pot, and # 2: I see some shari work on the trunk, which speaks of a wish to make the tree look like a bonsai. Remember John Naka's priceless advice: "Don't make your tree look like a bonsai, make your bonsai look like a tree". (Apologies to the old-timers, who have seen this saying posted a hundred times already.) Where there is no need for a shari or jin, leave them off and concentrate on the most essential characteristics of your bonsai.

Lisa
You do not have the required permissions to view the files attached to this post.
User avatar
MelaQuin
Aussie Bonsai Fan
Aussie Bonsai Fan
Posts: 1340
Joined: November 7th, 2008, 2:16 pm
Favorite Species: olives & natives
Bonsai Age: 20
Bonsai Club: Illawarra Bonsai Society, Bonsai Society of A
Location: St George Area, Sydney Australia
Been thanked: 1 time

Re: Before, After and future.

Post by MelaQuin »

elm.JPG
Here I go again, one would think I had a direct line to Sal Liporace's thinking. The tree is too tall. I'd cut 'around' the red mark and use the branch on the right as the new header. While you were establishing your header you could let the top stay and have the branches elongate enough to use them for thread grafting in the lower areas.

When the grafts had taken I would carefully remove the top knot so carving could be done to look as tho the top had taken a lightning strike and the shari would be deepened to look as tho the top took a gouge out of the trunk as it ripped off. Several years of work but the tree at the moment is telling two different stories... lush at the top, hardship at the bottom. I would work on the hardship angle.

The way elms grow you will never get the lower branches to thicken with the same speed the upper structure will so the tree will always be unbalanced if you leave it this way. I like the Fairy cave at the base... lots of interest in the tree .. lots of potential. A great workshop tree to get one to one advice. If you prefer it this height then I would keep the upper structure well cut back all the time to allow more energy to flow to the lower branches to fatten them.

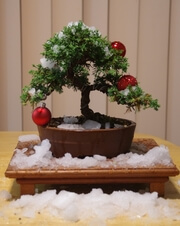
I think a darker pot would blend better with the tree. The current pot and the tree don't feel right to me.
You do not have the required permissions to view the files attached to this post.
Last edited by MelaQuin on June 9th, 2010, 4:46 pm, edited 1 time in total.
Guy
Aussie Bonsai Fan
Aussie Bonsai Fan
Posts: 765
Joined: February 16th, 2010, 6:29 pm
Favorite Species: juniper
Bonsai Age: 15
Location: Winkie SA
Been thanked: 1 time

Re: Before, After and future.

Post by Guy »

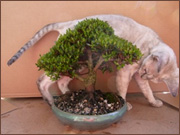
I'm don't like those fat exposed roots-I would plant it in a much deeper pot -covering those exposed roots-and try to get some radial roots growing -once established then would remove those fatties-if this can be done it would also reduce the height-and trunk would flare from ground level---after all that I'm wondering if elms readily send out new roots
User avatar
kcpoole
Perpetual Learner
Perpetual Learner
Posts: 12292
Joined: November 12th, 2008, 4:02 pm
Favorite Species: Maple
Bonsai Age: 15
Bonsai Club: the School Of Bonsai
Location: Western Sydney, NSW, Australia
Has thanked: 19 times
Been thanked: 96 times
Contact:

Re: Before, After and future.

Post by kcpoole »

Hi Dumper
Finally got back and did a little virt to illustrate what I think

Separated the branching a little, and removed a few on the right hand side

Ken
You do not have the required permissions to view the files attached to this post.
Check out our Wiki for awesome bonsai information www.ausbonsai.com.au/wiki
What is Bonsai? http://www.ausbonsai.com.au/wiki/index.php?title=Bonsai
What should I do now? http://www.ausbonsai.com.au/wiki/index.php?title=Newbie
How do I grow a Bonsai? http://www.ausbonsai.com.au/wiki/index. ... _a_Bonsai?
Visit a Bonsai nursery to see some real nice trees http://www.ausbonsai.com.au/wiki/index. ... _Nurseries
Post Reply

Return to “Deciduous”